
How can you build a set of personas for your organization today?
Our User Personas Blog series appears in three parts:
-
How to Create a Set of Personas (this post)
Personas are human-centered design and research tools used to design better products, services, and experiences that meet the needs of users.
User personas are best developed when they are based on the data analysis of real users who participate in human-centered research, like in-depth interviews, observations, and diary studies. From this research, you can more easily group users with similar characteristics, goals, challenges, and so on––and with these key components of their lives and backgrounds, you can craft a life-like set of personas. We recommend creating 4 to 6 user personas for a given service or organization.
We’ve broken down our process for building a set of compelling user personas into 5 steps:
Step 1: Roughly Define Who You Will Study
Step 2: Conduct Research
Step 3: Identify User Groups
Step 4: Draft Personas
Step 5: Finalize & Design Personas
STEP 1: ROUGHLY DEFINE WHO YOU WILL STUDY
Ask yourself the big questions: Who exactly are you studying? Who do you think your personas are, roughly? How can you differentiate between your personas? Are your personas being defined by the type of work they do or by another characteristic?
For example, when creating personas for a medical team, you may broadly decide to construct personas for a physician, a nurse practitioner, a front-office receptionist, and a medical assistant. However, if you want to create an even more specific set of personas representing, say, the various physicians who use a particular app, then you might create 3–4 physician personas differentiated by characteristics like years of experience, technology familiarity and comfort, patient approach, specialty, and so on.
Of course, you likely won’t know exactly who your personas will be at the beginning of the project, but having a ballpark idea will make recruiting for research much more effective. And, you will most likely uncover new and different personas once you start talking to users.
As an exercise, ask your team or client to think about the different types of people who use their products or services. Are there any obvious groupings? For research (Step 2), we recommend you try to recruit 4–6 participants per group or per defining characteristic.

STEP 2: CONDUCT RESEARCH
To build an accurate set of personas that truly represent your users’ characteristics, pain points, and motivations, it’s important to have real user data. In a previous blog series, we explored some of the best techniques for conducting qualitative user research.
They include:
-
In-depth, one-on-one interviews (download our FREE User Interview Workbook now!)
-
Surveys
We generally encourage you to use ‘data triangulation,’ which is the process of collecting data from multiple sources to cross-reference and validate the findings heard from user to user. If feasible, we really recommend employing at least two of the research methods above for building your personas.
In particular, when conducting research specific to persona building, you might ask interview questions that get at the user’s demographic and professional background, like age, job role, years of experience, and so on. What are their biggest challenges? What is their favourite thing about the product/service, or about their job? What are they trying to accomplish through the product or service? With observations and interviews, you might also try to understand what a typical day in their life looks like. What tasks are they doing on a daily basis? And so on.
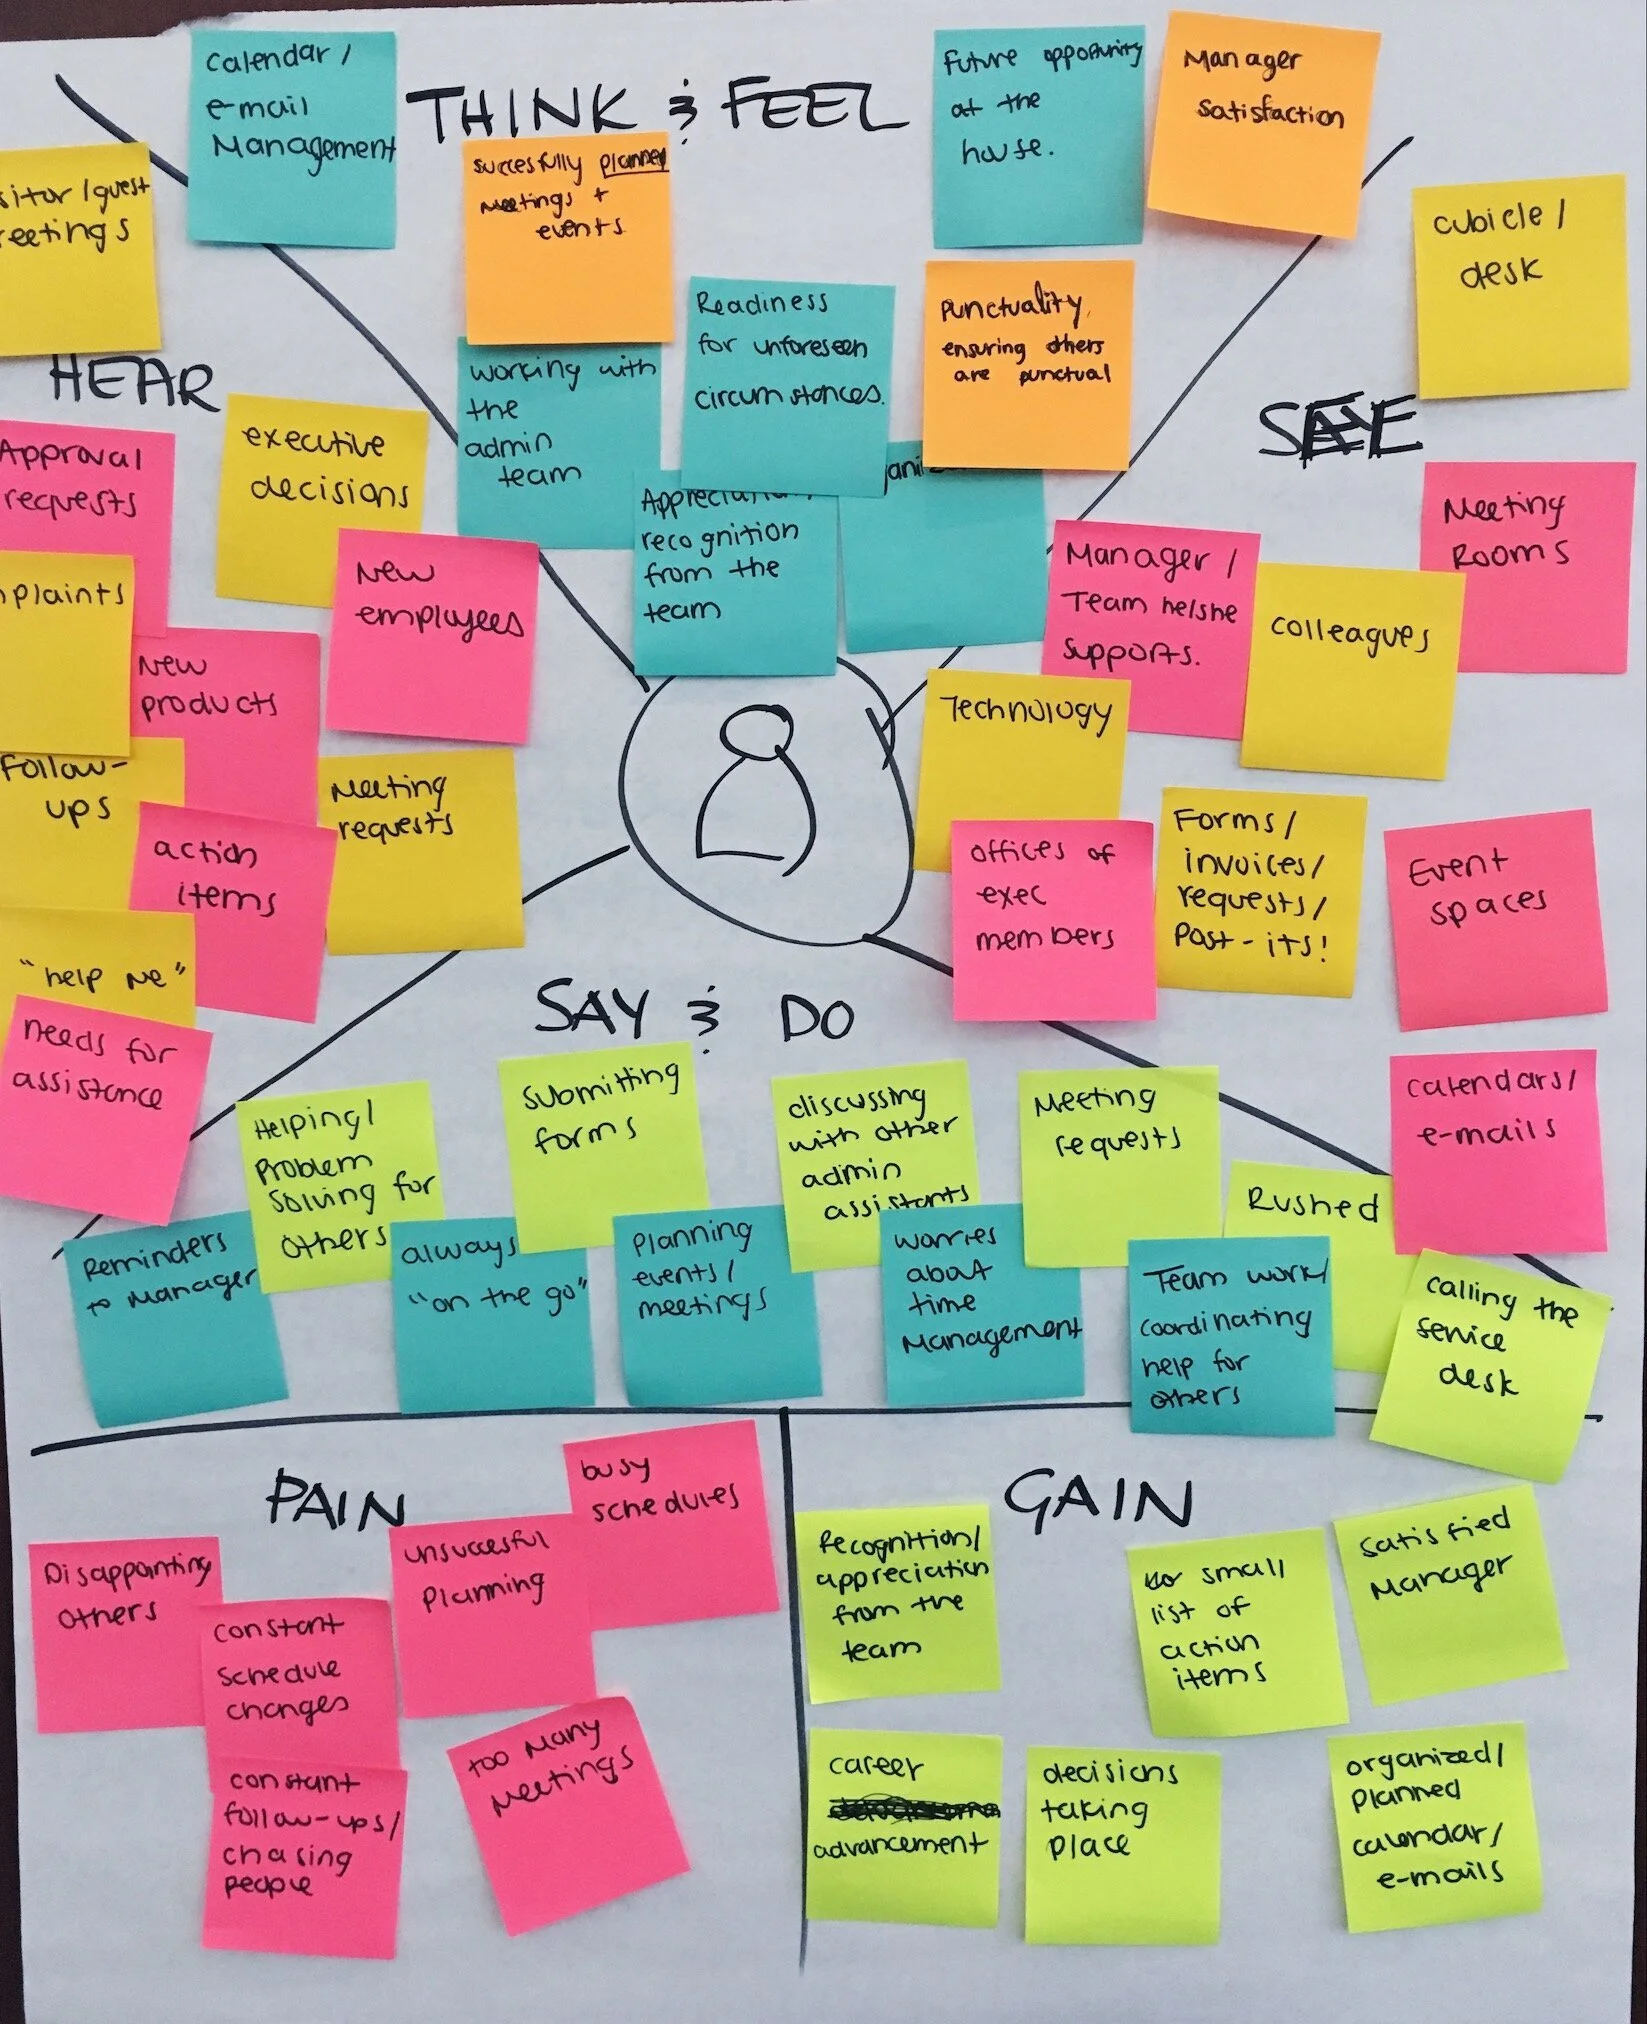
Similarly, if you conduct a workshop with users, we recommend a 5-Step Empathy Map exercise. You can also download our FREE Empathy Map Template PDF with steps for your next workshop.
For this exercise, you will:
-
Break the group up into teams of 4 or 5. Have each team be responsible for one persona. (You will need to roughly define these groups before Step 1, and team members would preferably represent the persona they are working on).
-
Draw or print out the Empathy Map diagram on a large flip-chart sized paper and give one diagram to each team, or for each persona.
-
Have teams brainstorm what their persona would See, Hear, Think, and Do. Have them write down their ideas on post-it notes, and stick them on the diagram in the appropriate sections.
-
Have them fill out the “Pain” (for pain points) and the “Gain” (for motivations) section in the same manner as Step 4.
-
Summarize and present empathy maps. Once all teams have completed their diagrams, ask them to summarize each section into 2-3 key ideas and present. You can then use this information to start building your personas.
Don’t forget to grab your FREE copy of Outwitly’s Plan A Stellar Interview Workbook to get your persona research started!
Once the research is complete, summarize your observation/workshop notes and transcribe your interviews so that you can easily reference this information for the next steps.
STEP 3: IDENTIFY USER GROUPS
With your collected data, assemble your research participants (from the interviews, observations, and/or workshops) into 4 to 6 groups, which we’ll call “user groups.” Group the participants according to their similar goals, backgrounds, characteristics, and so on. Each user group identified will then represent one persona. You’ll ideally have at least four research participants that can be slotted into each user group.
One approach to organizing this data is with a spreadsheet. Begin by listing the key characteristics and components of each persona down the first left-hand column. Then, across the top row, list your participants. Move down the list, and mark with an “x” when a participant has a specific characteristic. With this technique, you’ll be able to see at a glance which participants are similar to one another (and together might comprise a user group!) This also enables you to later identify which participants you used to craft each persona.
Important note: participants will not always be entirely similar, and this is normal. For example, you may have two participants with similar mindsets, beliefs, and characteristics, but they are completely different ages. That’s okay. Do your best to group them anyway. Beliefs and characteristics usually matter more than less important factors like age or location. User groups are rarely perfect, and hopefully some clear groupings will emerge!
Once you have identified the user groups, name each group (i.e. “Tech-savvy physician”) before moving on to Step 4.
STEP 4: DRAFT PERSONAS
The next step is drafting the personas. As mentioned above, each user group should represent an individual persona. Create a bulleted list or write a summary for each persona. Take a look at Step 5 (below) for ideas. To draft a realistic narrative, we recommend diving back into your research notes or interview transcripts to pull out relevant life details directly from the research.
Once each persona has a written summary, review to ensure everything you wanted to capture has indeed been captured. As well, ensure there is not too much overlap between personas, and feel free to tweak the characteristics accordingly so that each one is sufficiently unique.
For example, if you have two personas very similar in age, and you know that your users are actually many different ages, list one persona as older and the other as younger. Strive for gender balance, and try to make your personas diverse and culturally representative.
Remember, personas are archetypes! They do not represent only one individual, so you must try to balance the research data so that each persona is distinct.
STEP 5: FINALIZE & DESIGN PERSONAS
Now that your personas are drafted and each one is clearly distinct, you’ll want to refine and stylize them further.
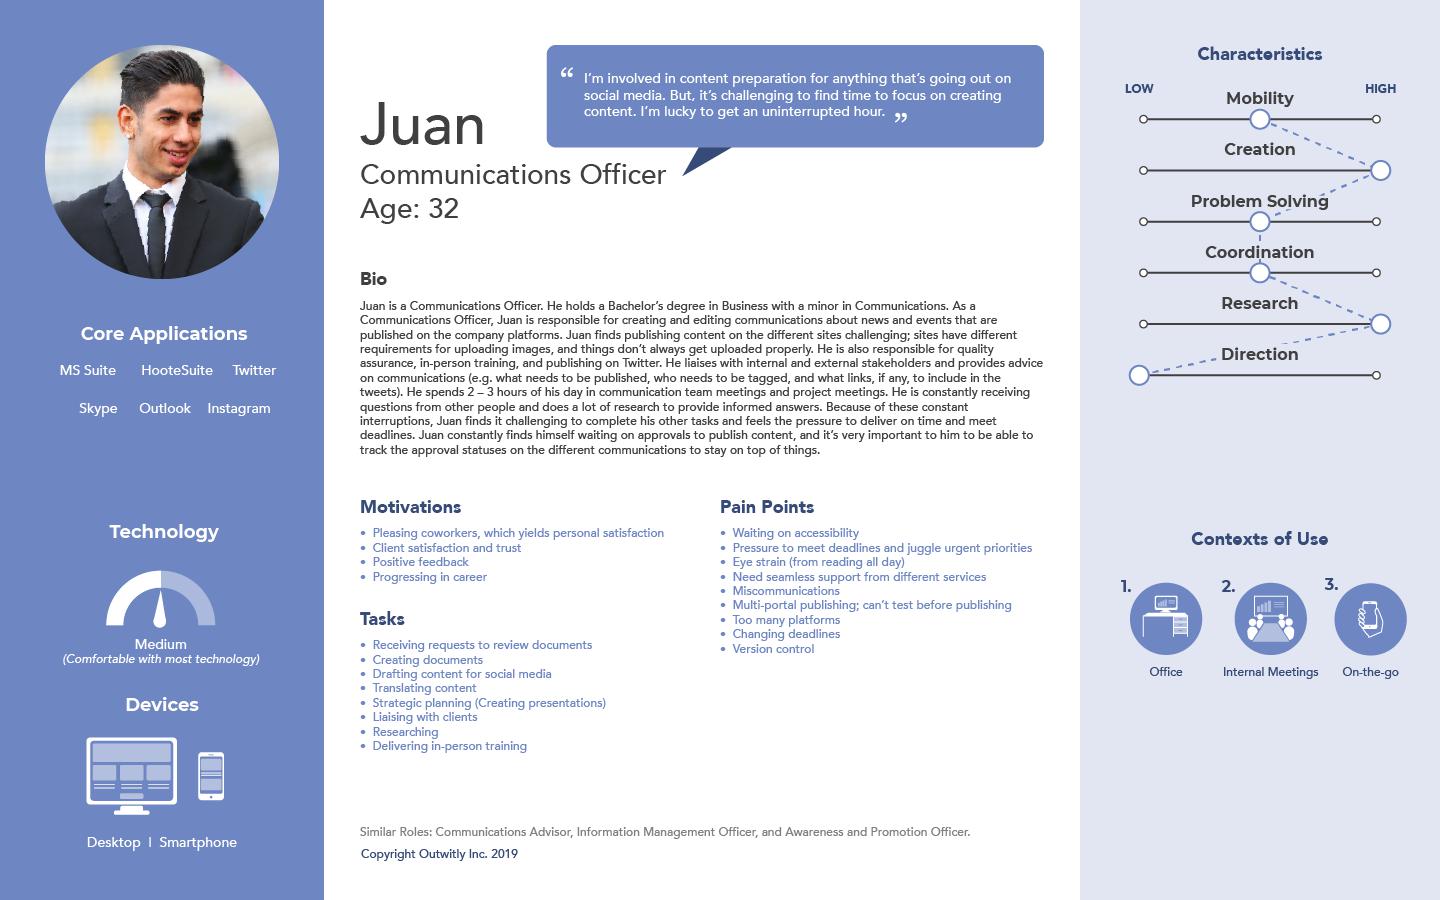
To begin, each persona should have the following basic components:
-
Name
-
Descriptor (usually a few words to represent the persona—often the name of the user group selected in Step 3—for example, “Admin Assistant” or “Tech Savvy Physician”)
-
Age
-
Photo (an animation, icon, or photo––we like to use photos since they tend to be more memorable)
-
Quote (this should capture the essence of that persona in only one or two sentences––we recommend anonymously using an actual quote from a research participant who represents the persona in question)
-
Biography (a paragraph explaining the broader context of the user, a bit about their background and experience, etc.)
-
Motivations (a bulleted list of 3-5 goals––what does this persona care about most? what are they trying to accomplish?)
-
Pain Points & Challenges (a bulleted list of 3-5 main pain points––these can be specific to the product or service they are using, or frustrations the user has that could be solved by a new/improved product/service)
Extras and value-ads for personas may also include:
-
Tasks (a bulleted list of tasks or activities that the persona typically undertakes)
-
Location
-
Technology Experience (Low to High)
-
Devices: what devices do they use? (i.e. iPhone, laptop, tablet, etc.)
-
Other variables specific to the project, product, or service (i.e. you might include education level if designing an educational service, or account type if designing for financial institutions, and so on)
-
Scales: can you identify a set of variables that you can easily compare and contrast personas against? (i.e., their access to support or services, their technological experience/knowledge, etc.) Select 4 or 5 scales and rank your personas from low to high. The scales should be the same for each one of your personas––they will only vary from low to high.
(Note: It’s important not to make your personas too long or text heavy, as you still want people to read them. Only add sections to your personas if they are relevant and important––do not add information simply for the sake of adding it!)
Remember to visualize your personas!
Finally, as a last and critical step, visualize your personas. This is key to their longevity in your organization, so they can be easily included in presentations and remain memorable.
A few tips:
-
Make your personas visually interesting and beautiful.
-
They should look like a matching set.
-
Consider using different colours for each persona.
-
Copyedit them––ensure there are no spelling mistakes.
View this post on Instagram
Click through for some complete sample personas…
In Part 3 of this series, we explain how to validate and communicate your new set of personas to your stakeholders and clients, and how you can directly and immediately begin applying them to your work!
Resources we like…
-
UX Mastery’s How To Create UX Personas
-
Creating Personas with UX Booth
-
Great article in UX Mag about Personas & User Experience
Related Posts
-
User Personas Series: Part One
-
User Personas Series: Part Three
-
Research Method Series: in-depth interviews; contextual observations; diary studies.