At Outwitly, we’ve been talking about empathy map workshops for a long time! Empathy mapping is an amazing tool that designers, UX researchers, and stakeholders can use to develop an empathetic understanding of the people they design products and services for. Since no one can read minds (if only!), an empathy map workshop helps with visualizing what’s really going on in the heads and hearts of users and customers. (This is a central tenet of human-centered design.)
Facilitating workshops can feel like a lot, but today’s post will break down empathy mapping into a ton of detail so you and your team know exactly how to conduct a great one!
We’ll answer these questions from an experienced UX/service design perspective:
- What is an empathy map?
- What is an empathy map workshop?
Then, we’ll dive into:
- 9 Steps for Running an Effective Empathy Mapping Workshop
- + We’ll link you to a free empathy map template we use all of the time!
Let’s get started!

What is an empathy map?
An empathy map is a collaborative tool that highlights the perspectives and motivations of a group of customers, users or stakeholders to help us empathize with them. Empathy maps are commonly used by team members and stakeholders in design projects where the end goal is to improve the experience of using a product or service!
What’s included in an empathy map?
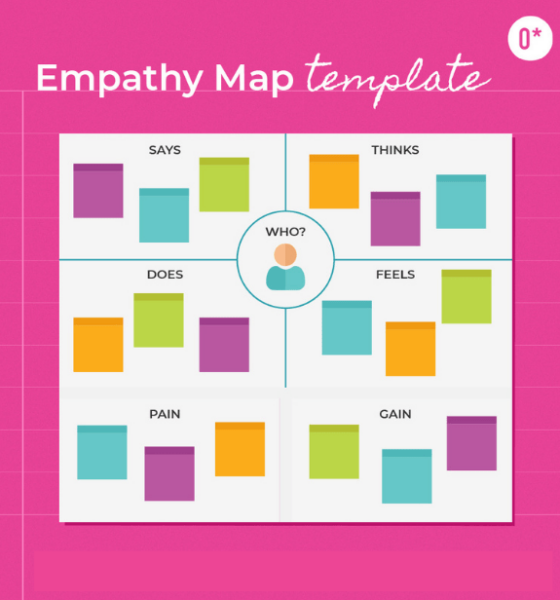
Traditionally, an empathy map includes the name of a persona or user group and four quadrants for mapping out their thoughts, feelings, actions and observations. This is typically done with a digital whiteboard and sticky notes, but it can be done analog-style as well.
What are the four parts of an empathy map?
The four parts of an empathy map usually identify what a user/customer thinks, feels, says and does. Another variation we use often is “sees”/“hears”/“thinks”/“does.” We also include sections for “pains” and “gains.” The quadrant categories that you choose might depend on what group of people you’re studying, what user or customer experience you’re looking to improve, and what design problem areas you’ve already identified.
Why are empathy maps important in product development and service design?
In product development and service design, empathy maps help designers, UX researchers, and stakeholders develop empathy for users that informs valuable, memorable products and services. We build empathy in human-centered design so that the “things” and experiences we create truly solve a need. When a product is desirable, valuable, and usable, it builds customer loyalty — so it makes good business sense to invest in building empathy for users. Every organization needs this design approach.
What is an empathy mapping workshop?
An empathy mapping workshop is an exercise where project team members including designers and researchers can collaborate and map the perspectives/motivations of users, customers or stakeholders. Ideally, empathy mapping workshops (also called “empathy map workshops”) are conducted with the people being studied… or, at the very least, they should be conducted using source data from research conducted with your subjects as a jumping-off point for design thinking and/or further research.
9 Steps to Running an Empathy Map Workshop
There are nine overall steps to running a successful empathy map workshop:
- Create an agenda
- Prepare and send materials
- Intros and warm-up
- Explanation/solo brainstorm
- Divide the group into teams
- Build empathy maps
- Presentation of empathy maps
- Thank-yous and next steps
- Send, review, implement
Below, we’ve divided these steps into three sections, along with our best tips for facilitating a great empathy mapping workshop (and getting actionable empathy maps out of the workshop as deliverables!).
At the end, as promised, we’ll link you to our free empathy mapping downloadable template.
Planning Your Workshop
1. Create an agenda
Time management is critical for facilitating remote workshops. Once you have an idea of how many people you’ll be inviting, plan out each key discussion you want to cover and how long it should take.
Consider setting aside an hour to an hour-and-a-half with these time chunks:
- 5 minutes to allow people to join the call
- 2 minutes to introduce yourself
- 5–10 mins for an icebreaker
- 5 minutes to introduce empathy mapping
- 30 minutes for conducting the empathy mapping
- 5 minutes for each group to present
- 10 minutes for a “bio break”
- 5 minutes to summarize, discuss next steps and to thank the attendees
2. Prepare and send materials
Next, you’ll create your virtual empathy mapping whiteboard and meeting invitation. For your whiteboard, we recommend Miro, MURAL, or Figjam. Some whiteboards allow you to hide frames you create until you’re ready to reveal them!
Creating your whiteboard
Your whiteboard should include:
- Your schedule so others understand what to expect from the meeting
- Goals for the session
- An introduction to empathy mapping
- Space on the board for each team’s empathy map
- A description of the specific circumstances and goals of the user groups being examined in the workshop
Creating your meeting invitation
Your meeting invitation should include:
- An Introduction of yourself
- An outline of the workshop and its purpose
- Links to any workshop tools you’ll be using (and a how-to video to help everyone prepare)
- Links to any user research materials you want participants to review ahead of time
- A request to privately disclose any accessibility requirements
We also recommend inviting a co-host. (They can take the pressure off and assist with breakout room facilitation!)
Launching an Empathy Mapping Workshop
3. Intros and warm-up
- Log in 10 minutes before the session starts
- Introduce yourself (Discuss your credentials and background; outline what you’ll be doing together)
- Warm up the group with an icebreaker (We like the ones from Gamestorming and Figjam)
A warmup can help everyone get comfortable with each other and get them into a beginner’s mindset. Don’t skip it!
4. Explanation/solo brainstorm
Introduce empathy mapping, and have everyone start solo:
- Open your whiteboard and show them what you’ve prepared, including empathy map examples
- Ask everyone to brainstorm what the user groups being studied would see, hear, think, and do (or some other combination of quadrants) while trying to complete a specific goal
- Then have individuals brainstorm pains and gains (I.e. pain points/challenges and motivations/benefits)
Asking individuals to write down their ideas individually first can help with avoiding groupthink!
Accessibility tip: Remember to also consider your audience and adapt your questions to contain inclusive language as needed.
Empathy Mapping in Your Workshop
5. Divide the group into teams
- Break your workshop group up into teams of 4–5 people
- Have each team be responsible for one user group
- Determine which member will present their team’s empathy map later on
- Provide clear instructions for what they’ll be doing and how much time they’ll have
- Open the breakout rooms and start two timers
- Option: Play some non-intrusive background music! (If your whiteboarding tool doesn’t have a playlist, try out our favourite playlist)
6. Build empathy maps
Below are the instructions and procedures you should go over with the group before breaking them into smaller groups. Throughout the workshop, you should also drop into the breakout rooms to listen in and ensure that everyone’s on the right track and contributing.
- Each group will brainstorm what their user group would see, hear, think, and do
- Then they’ll write down their ideas on their virtual sticky notes
- They’ll place their sticky notes onto their empathy map
- When the first timer goes off, the teams should move on to brainstorming and filling out pains and gains
- When the second timer goes off, you’ll close the breakout rooms
- (Stop any music you might have put on)
Another accessibility tip: Don’t forget to proactively and discretely check on anyone who has disclosed accessibility requirements to ensure they’re feeling comfortable and able to participate equally.
Wrapping Up Your Empathy Mapping Workshop
Once everyone is back in the same conversation, your goal is to keep the energy going as people start to fade and disconnect!
7. Presentation of empathy maps
- Give everyone a 10-minute “bio break”
- When everyone returns, ask each presenter to share their team’s empathy map
- Let them know they’ll each have 5 minutes (Set a timer)
- Have them present 2–3 key ideas per map section
- As each team presents, prompt them with follow-up questions to ensure that enough detail is shared (Some people might be concise or quiet!)
- Take notes on any themes you observe to share with the group in your summary
8. Thank-yous and next steps
- Thank all workshop participants and presenters for their participation
- Discuss any next steps (E.g. completing a workshop feedback survey)
- End the call!
9. Send, review, implement
- Refine, package up and present/send your empathy maps to the rest of your project team and your stakeholders
- Have them review the empathy maps and provide any feedback / ask any clarification questions
- Once they’ve been looked over, you can use the information from your empathy maps to inform further research or to build/refine your personas
Free Empathy Mapping Template

Why build your own empathy map from scratch when you can get a free empathy mapping template? The answer: you don’t. You use ours (linked above)! It comes all packaged up with easy outlined steps to follow.
Well, that’s it! Congratulations, you’re ready to lead an empathy mapping workshop. We hope this post gave you the answers you were looking for and that your next workshop goes off without a hitch. (Great workshop facilitation isn’t easy, but it comes with practice.)
By the way, if you liked this post, you’d probably enjoy our weekly newsletter. Join thousands of subscribers who’re staying in the know about the latest HCD tips: